在树莓派上有几个 web 服务,不过只能在本地使用,无法通过外网访问,所以试着使用 Cloudflare Tunnel 来进行内网穿透,这里记录下我的操作过程。
前置条件
一台已连接互联网的linux服务器(不需要公网ip)
cloudflare账户,虽然cloudflare tunnel套餐是免费的,但可能需要绑卡。
需要有一个域名,并把它的DNS迁到cloudflare
需要在服务器上安装cloudflared
需要在客户端也安装cloudflared
cf tunnel没有实际”转发“端口,它的流程是 :
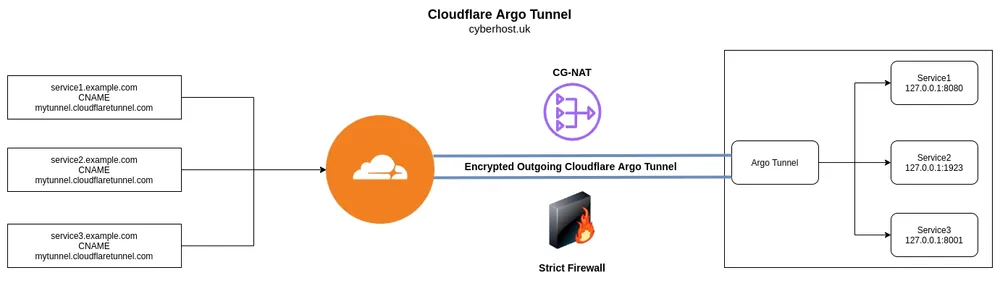
访问my-cf-tunnle.example.com -> 解析CNAME为UUID.cfargotunnel.com -> 流量到达cf的服务器-> cf的服务器根据UUID把流量转发到你的机器 -> 你的机器根据config.yml把流量转发到tcp或ssh或http服务。
cf tunnel使用的quic协议和cf服务器建立连接 datatracker.ietf.org
access是客户端,tunnel是服务端
Cloudflare Argo Tunnel
Cloudflare Tunnel
Table of Contents
cf tunnel没有实际”转发“端口,它的流程是 :访问my-cf-tunnle.example.com -> 解析CNAME为UUID.cfargotunnel.com -> 流量到达cf的服务器-> cf的服务器根据UUID把流量转发到你的机器 -> 你的机器根据config.yml把流量转发到tcp或ssh或http服务。
cf tunnel使用的quic协议和cf服务器建立连接 datatracker.ietf.org
Cloudflare Warp vs Cloudflare Tunnel
During the beta period, Argo Tunnel went under a different name: Warp
Cloudflare WARP != Cloudflare Argo Tunnel
Cloudflare Tunnel = Cloudflare Argo Tunnel
通过Cloudflare Argo Tunnel 访问本地网站原理
https://developers.cloudflare.com/cloudflare-one/connections/connect-apps/
https://zhuanlan.zhihu.com/p/482666652
cloudflare saas 自选 ip

基本上在自己服务器上安装了 cloudflared 后就可以全程在网页控制面板上操作。
我也体验了一把,确实可以省掉用于中转的公网服务器了。然而,实在是太慢了
1.Cloudflare Tunnel creates a secure, outbound-only connection between your services and Cloudflare by deploying a lightweight connector in your environment.
Cloudflare Argo Tunnel 工作方式类似于 frp,可以将本地服务发布到公网。只不过 frp 所需的服务器 IP 在 Argo Tunnel 中变成了 Cloudflare 提供的节点。Cloudflare Argo Tunnel 连接本地web服务器端口和 Cloudflare 节点。
2.Cloudflare Tunnel exposes applications running on your local web server on any network with an internet connection without manually adding DNS records or configuring a firewall or router.
Cloudflare Tunnel可以將內部網路與 Cloudflare 之間打通。
3.Cloudflare Argo Tunnel: A local Private WebServer to the Public Internet
4.In our case, we want to reach internal resources without a VPN. Argo tunnel will running directly from an internal server and will forward the traffic to the targeted resources.
cloudflare tunnel通过在源站和cloudflare边缘节点建立一条隧道,所有访问此服务的流量都要先到达cloudflare,再经过cloudflare和服务器源站之间建立的cloudflare tunnel到达源站。同理,源站对客户端的响应也要先通过cloudflare tunnel送到cloudflare的边缘节点,再由cloudflare边缘节点送给客户端。cloudflare tunnel提供了两点好处:(1)隐藏源站,所有的流量都要经过cloudflare边缘节点,在cloudflare配置访问控制规则,可以过滤掉非法请求;(2)可以借助cloudflare tunnel提供内网内的服务。如接入家用宽带的服务一般只能在同一个网络内才能访问,但是借助cloudflare tunnel可以让在其他网络中的设备通过互联网访问此服务。
下图是cloudflare tunnel的工作原理示意,建立cloudflare tunnel需要一个工具,这就是cloudflare提供的cloudflared。将cloudflared部署在源站服务器上,cloudflared主动和cloudflare边缘节点建立隧道,并将信息上报给cloudflare。隧道建立后,如果有合法的流量访问源站服务,则cloudflare会通过cloudflare tunnel将流量送到源站。
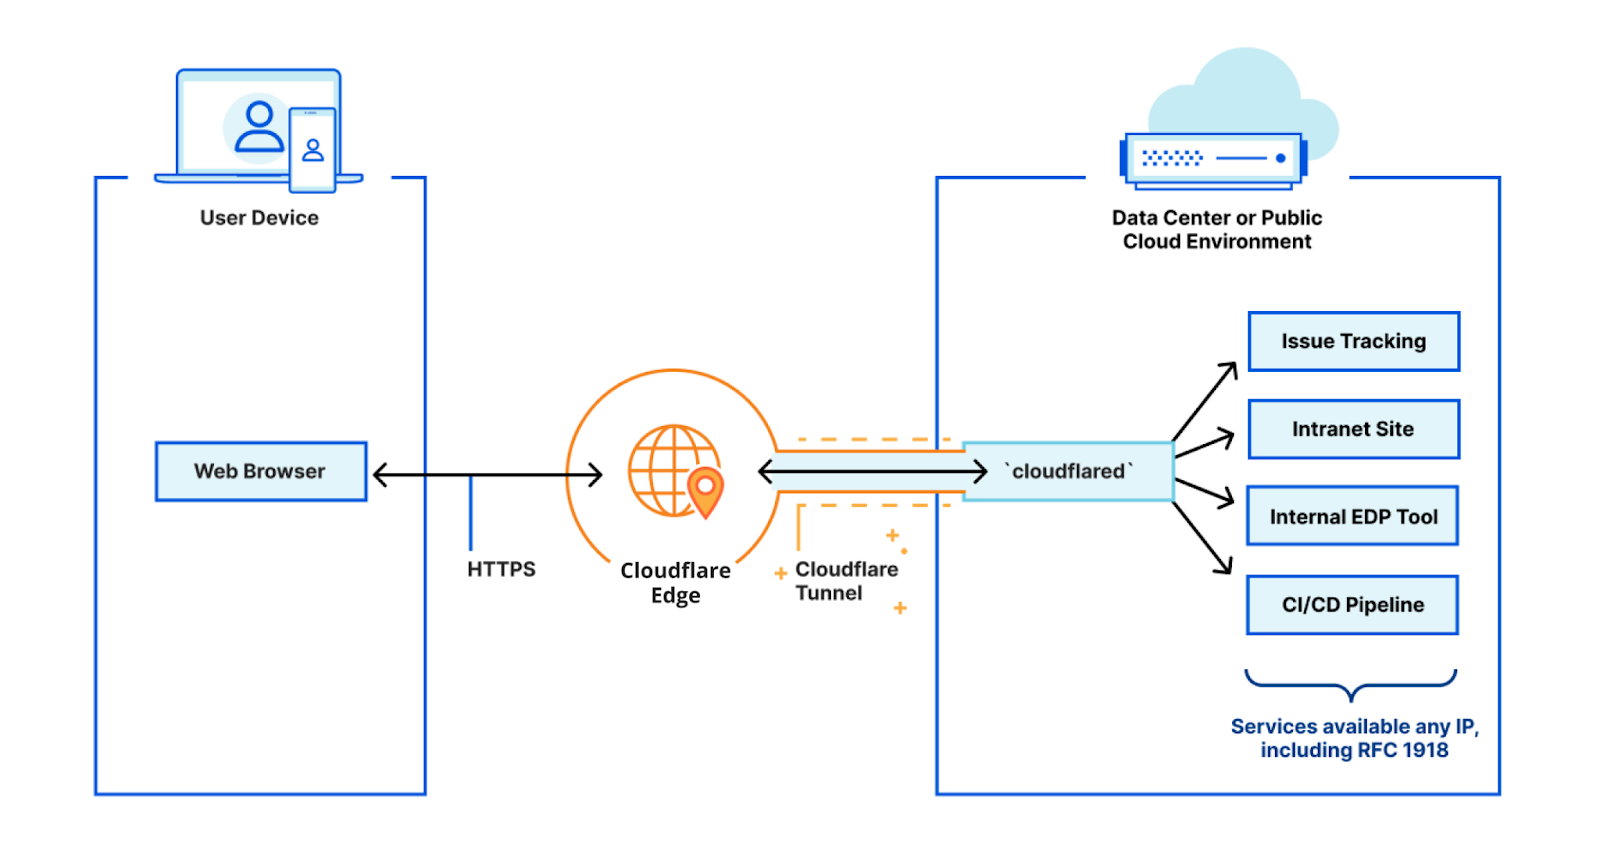


Cloudflared establishes outbound connections (tunnels) between your resources and the Cloudflare edge. Tunnels are persistent objects that route traffic to DNS records. Within the same tunnel, you can run as many cloudflared processes (connectors) as needed. These processes will establish connections to the Cloudflare edge and send traffic to the nearest Cloudflare data center.
Prerequisites
Cloudflare Account (free)
Change your domain nameservers to Cloudflare
Domain added to Cloudflare (using CF nameservers, etc)
Linux server with a web server already configured on it
No ports need to be port forwarded or allowed through your firewall
root@iZbp18j0fr5xhywnh03waxZ:~# cloudflared --version
cloudflared version 2022.5.1 (built 2022-05-11-1403 UTC)
How to use
Argo Tunnel is fast to install and run - it’s just three commands to expose a locally running web application:
$ install cloudflared
//安装 Argo Tunnel Client
// binaries available for Linux, Mac and Windows https://developers.cloudflare.com/argo-tunnel/downloads/
$ cloudflared login
$ cloudflared --hostname example.com http://localhost:8080
You will be able to install cloudflared as a service, create and run tunnels, and get an overview of your active and inactive connectors.
Cloudflare Tunnel On Ubuntu client
Part 1:download and install the Cloudflare Tunnel CLI tool
Install cloudflared and Authorize Cloudflare Tunnel
Step 1. Install cloudflared on vps(aliyun)
Cloudflare Tunnel requires the installation of a lightweight server-side daemon, cloudflared, to connect your infrastructure to Cloudflare
To get started, download Argo Tunnel and follow our quickstart guide. If you’re curious how it works, you can also check out the source.
https://github.com/cloudflare/cloudflared/releases
download url:
登录你的 VPS
copy the command in the box below and paste it into a terminal window. Run the command.
wget https://github.com/cloudflare/cloudflared/releases/latest/download/cloudflared-linux-amd64.deb
wget https://github.com/cloudflare/cloudflared/releases/download/2022.6.3/cloudflared-linux-arm64.deb  20220625 updated
dpkg -i cloudflared-linux-amd64.deb
output
root@iZbp18j0fr5xhywnh03waxZ:~# ls -l
total 28480
-rw-r--r-- 1 root root 15560854 May 11 22:05 cloudflared-linux-amd64.deb

root@iZbp18j0fr5xhywnh03waxZ:~# dpkg -i cloudflared-linux-amd64.deb
Selecting previously unselected package cloudflared.
(Reading database ... 119796 files and directories currently installed.)
Preparing to unpack cloudflared-linux-amd64.deb ...
Unpacking cloudflared (2022.5.1) ...
Setting up cloudflared (2022.5.1) ...
Processing triggers for man-db (2.8.3-2ubuntu0.1) ...
ohter:
[Cloudflare]: Please verify your email address
https://dash.cloudflare.com/profile->Preferences->Verification email sent
Cloudflare update
~# cloudflared update
2022-06-24T16:57:59Z ERR cloudflared was installed by a package manager.
Please update using the same method.
download latest .deb from https://github.com/cloudflare/cloudflared/releases and install it again
Step 2. Login to Cloudflare-Argo Tunnel Client login
Argo Tunnel Client 需要使用者登录 Cloudflare 账号以进行授权,执行:
root@iZbp18j0fr5xhywnh03waxZ:~# cloudflared tunnel loginThis command should give you the link.
在无头模式的机器上,执行完毕后会输出一个链接.复制链接备用.
output
Please open the following URL and log in with your Cloudflare account:

https://dash.cloudflare.com/argotunnel?callback=https%3A%2F%2Flogin.cloudflareaccess.org%2FE63Xmtwi65theBI2lOxuw1p0Hfb-eKdvW9utmgo%3D

Leave cloudflared running to download the cert automatically.
2022-05-25T15:31:27Z INF Waiting for login...
2022-05-25T15:32:20Z INF Waiting for login...
2022-05-25T15:33:14Z INF Waiting for login...
2022-05-25T15:34:07Z INF Waiting for login...
复制控制台出现的网址登录你的CloudFlare账号。
Step 3: Authorize Cloudflare Tunnel
Open a browser on windows on another pc .
copy link and Open link url on browser:https://dash.cloudflare.com/argotunnel?callback=https%3A%2F%2Flogin.cloudflareaccess.org%2FE63Xmtwi65theBI2lOxuw1p0Hfb-eKdvW9utmgo%3D
logging in to your account
select your hostname.
Cloudflare Tunnel wishes to serve as an origin on one of your zones.
Please select the zone you want to add a Tunnel to.
复制链接到浏览器内登陆账号,登录后选择使用的域名,完成验证,
output
Success
Cloudflared has installed a certificate allowing your origin to create a Tunnel on this zone.
You may now close this window and start your Cloudflare Tunnel!
Authorize Cloudflare Tunnel
Cloudflare Tunnel wishes to serve as an origin on one of your zones.
Please select the zone you want to add a Tunnel to.

Once the command has finished running, your vps will appear:
完成验证后,vps output
Please open the following URL and log in with your Cloudflare account:

https://dash.cloudflare.com/argotunnel?callback=https%3A%2F%2Flogin.cloudflareaccess.org%2FE63Xmtwi65theBI2lOxuw1p0Hfb-eKdvW9utmgo%3D

Leave cloudflared running to download the cert automatically.
2022-05-25T15:31:27Z INF Waiting for login...
2022-05-25T15:32:20Z INF Waiting for login...
2022-05-25T15:33:14Z INF Waiting for login...
2022-05-25T15:34:07Z INF Waiting for login...


You have successfully logged in.
If you wish to copy your credentials to a server, they have been saved to:
/root/.cloudflared/cert.pem
Once validated Cloudflare will return a cert.pem.
Part 2: Cloudflare Tunnel Configuration
create, delete tunnels and manage DNS records directly with cloudflared.
Create a tunnel
We have two ways to do it lets take a look at these:
way1:Cloudflared Dashboard
From the cloudflare dashboard select the DNS tab and add a new CNAME record. The record will point to the target tunelUUID.cfargotunnel.com, which is a domain available only through Cloudflare.
Click save to register.
way 2:CLI
As you saw previously we can manage our Cloudflare record once we have logged cloudflared with the certificate.
To add the record simply use the following command :
cloudflared tunnel route dns <UUID or NAME> web.gitlab.domain.com
cloudflared tunnel create cloudflaredtunneliaspnetcorecn628
Tunnel credentials written to /root/.cloudflared/b46e5-4607-4262-91f8-c4aa7163.json. cloudflared chose this file based on where your origin certificate was found. Keep this file secret. To revoke these credentials, delete the tunnel.

Created tunnel cloudflaredtunneliaspnetcorecn628 with id bd-4607-4262-91f8-c47163
cloudflared tunnel route dns cloudflaredtunneliaspnetcorecn628 www1.iaspnetcore.com
0000
Added CNAME www1.iaspnetcore.com which will route to this tunnel tunnelID=b46e596a7163
dash like as follow
b46e596daa7163.cfargotunnel.com
run
cloudflared tunnel run <UUID or Name>

cloudflared tunnel run cloudflaredtunneliaspnetcorecn628
other
cloudflared tunnel run cloudflaredtunneliaspnetcorecn628
2022-05-25T16:11:44Z INF Starting tunnel tunnelID=b46e598-c41a7163
2022-05-25T16:11:44Z INF Cannot determine default configuration path. No file [config.yml config.yaml] in [~/.cloudflared ~/.cloudflare-warp ~/cloudflare-warp /etc/cloudflared /usr/local/etc/cloudflared]
2022-05-25T16:11:44Z INF Version 2022.5.1
vim /root/.cloudflared/config.yml
url: http://localhost:80
tunnel: <Tunnel-UUID>
credentials-file: /home/{username}/.cloudflared/<Tunnel-UUID>.json
url: http://localhost:80
tunnel: <Tunnel-UUID>
credentials-file: /home/{username}/.cloudflared/<Tunnel-UUID>.json
Validating your configuration
root@iZbp18j0fr5xhywnh03waxZ:~# cloudflared tunnel ingress validate
Validating rules from /root/.cloudflared/config.yaml
OK
Testing your configuration
cloudflared tunnel ingress rule https://foo.example.com
Using rules from /root/.cloudflared/config.yaml
Matched rule #2
	service: http_status:404
root@iZbp18j0fr5xhywnh03waxZ:~# cloudflared tunnel ingress rule https://www1.iaspnetcore.com
Using rules from /root/.cloudflared/config.yaml
Matched rule #1
	hostname: www1.iaspnetcore.com
	service: http://localhost:80
Useful links
https://github.com/cloudflare/cloudflared
https://blog.csdn.net/alex_yangchuansheng/article/details/123564350
Cloudflare Tunnel On Windows 10
official website doc for Cloudflare Tunnel
https://developers.cloudflare.com/cloudflare-one/connections/connect-apps
https://juejin.cn/post/7186228417699217467
How to create cloudflare tunnel on windows 10 Step by step(GUI cn)
https://www.cnblogs.com/triangleowl/p/16293619.html