This post is about creating a Error Handling middleware in ASP.NET Core.
We can accomplish this in three easy steps.
Step 1: Create the Error Handling middleware class
First we need to create a ErrorLoggingMiddleware class that our MVC application can use to configure.
using Microsoft.AspNetCore.Http;
using System.Globalization;
using System.Threading.Tasks;

namespace Culture
{
    public class ErrorLoggingMiddleware(
    {
          private readonly RequestDelegate _next;
         private readonly ILoggerManager _logger;


        public ErrorLoggingMiddleware(RequestDelegate next, ILoggerManager logger)
        {
           _logger = logger;
           _next = next;
        }

        public async Task InvokeAsync(HttpContext context)
        {
            try
            {
                await _next(context);
            }
            catch (Exception ex)
            {
                await HandleExceptionAsync(context, ex);

                //Don't stop the error,rethrow the exception to show the error page
                ExceptionDispatchInfo.Throw(ex);
            }
        }

       private Task HandleExceptionAsync(HttpContext context, Exception ex)
        {


            var logPath = Path.Combine(path, filename);


            var logFile = System.IO.File.Open(logPath, FileMode.Append, FileAccess.Write, FileShare.ReadWrite);


            var logWriter = new System.IO.StreamWriter(logFile);

            var builder = new StringBuilder();
            builder.Append(DateTime.Now.ToString("yyyy-MM-dd HH:mm:ss.fff zzz"));
            builder.Append(" ErrorLoggingMiddleware ");
            builder.AppendLine(log.ReferrerUrl);
            builder.AppendLine(log.ShortMessage);
            builder.AppendLine(log.FullMessage);
            builder.AppendLine(log.PageUrl);
            builder.AppendLine(log.IpAddress);

            logWriter.WriteAsync(builder.ToString()).RunSynchronously();

            logWriter.Flush();
            logFile.Flush(true);

            return Task.CompletedTask;

        }
    }
}
The first thing we need to do is to register our IloggerManager service and RequestDelegate through the dependency injection. The _next parameter of RequestDeleagate type is a function delegate that can process our HTTP requests.
After the registration process, we need to create the InvokeAsync() method. RequestDelegate can’t process requests without it.
If everything goes well, the _next delegate should process the request and the Get action from our controller should generate a successful response.
But if a request is unsuccessful (and it is, because we are forcing exception), our middleware will trigger the catch block and call the HandleExceptionAsync method.
In that method, we will log error and write to a file.
Step 2: Configuring the Middleware
The next step is to configure our MVC application to use our new ErrorHandlingMiddleware .
To configure our MVC application to use our new ErrorHandlingMiddleware, we call app.UseMiddleware(..), passing our middleware type in our Program class’s Configure(..) method:
public void Configure(IApplicationBuilder app, IWebHostEnvironment env)
{
    if (env.IsDevelopment())
    {
        app.UseDeveloperExceptionPage();
    }

    // Hook in the global error-handling middleware
    app.UseMiddleware(typeof(ErrorHandlingMiddleware));


}
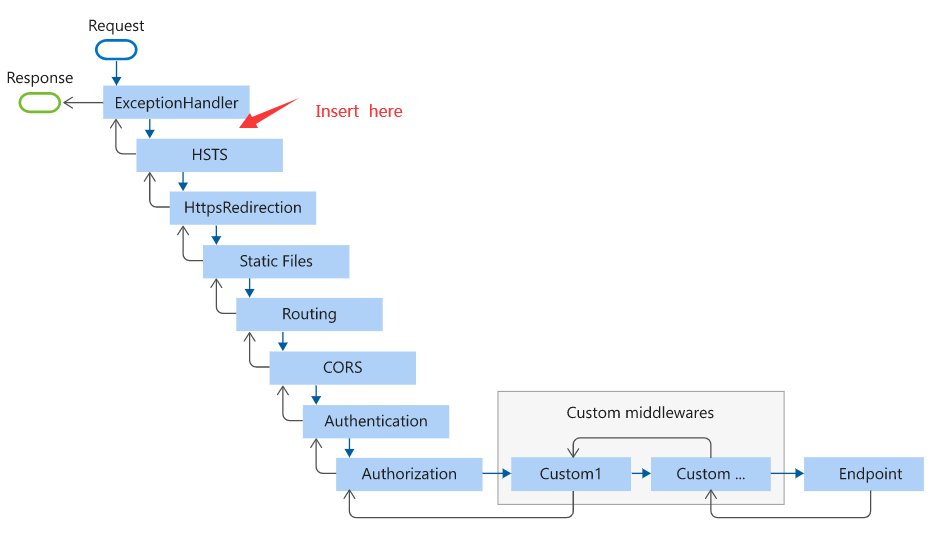
Middleware order
The following diagram shows the complete request processing pipeline for ASP.NET Core MVC and Razor Pages apps. You can see how, in a typical app, existing middlewares are ordered and where custom middlewares are added. You have full control over how to reorder existing middlewares or inject new custom middlewares as necessary for your scenarios.